So what have I been up to? I've completed another of my "to do" tasks on the sidebar! I FINALLY finished the laptop sleeve I'd been making, tired of stuffing my computer without any protective layer inside my handbag, where all sorts of unsavory finish-marring characters hang around. I used some Marimekko fabric from the Crate&Barrel outlet for the inside, a scrap of poly-batting and then some kitenge looking fabric I got in the street market in Nairobi, Kenya for the outside. The hook and loop tape was repurposed from one of those cloth bags they are packaging bed sheets in nowadays.

I have made laptop cases before, and I always use different methods. I, however do not have any photographs of either, which is one of the reasons why I'm doing this blog: I want to remember what I've made, and see it even after it leaves my hands. The first one I ever made used interfacing on the outside fabric and was lined with black fleece. I sewed around all edges with right sides together and then turned it inside out. I did a quick line of stitching around the opening edge and I think I used hook and loop tape to close it. When I changed computers, I gave my old laptop to my mom, and the sleeve went with it.
The second case I made was for my netbook. I used leftover fabric from quilts, this time Kangas from Tanzania my sister in law had, and some cottons from Joanns. It had a french seam with binding around the edges, and the closure was a button and a loop of cord. Because there was only a center button and the edges weren't rounded, the edges would flip up and drive me mad, but only I noticed, it seemed everyone else complimented me on it! I gave the netbook to my sister when she was left with no computer and no money to buy a new one, and the sleeve went with it as well.
While making the current sleeve, I traced around my laptop and added a bit extra so that I would be able to put the cables or mouse in the sleeve with the computer if I needed to. I quilted it first, making a sandwich with the fabrics and the batting, then I cut out the specific shape I had decided, and I sewed it with the lining to the inside and the edging on top so that I could fold it over and cover the seam allowances. The front of the sleeve has more fabric than the back, to make room for the height of the computer. From the side, the binding is flat on the tabletop, instead of sticking out in the middle, which would've happened had the front and back been the same width. In the bottom, I just made some pleats to ease in the difference.
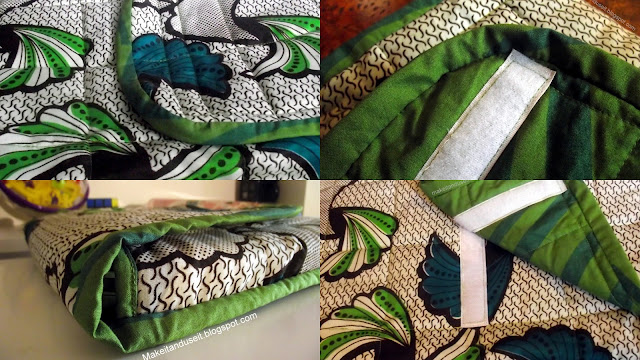
I made the edging by ripping strips from leftover lining fabric, to tie the inside and the outside together. I could've done it on the bias, but because I don't have a cutting mat or rotary cutter, making strips with scissors on a true bias is not worth the effort. I know that bias tape goes nicely around edges when ironed into shape. Because I didn't ease in the tape on the curves, there is less fabric going around the seam allowance than where it was sewn which makes the edging fold DOWN towards the laptop case, looking like it has a lip, and I like how that looks.
I also sewed on the binding by hand: first pass to attach binding and close sleeve was done with the machine, and I noticed my machine skipped a lot of stitches when it was going over bulkier areas. I didn't want to deal with skipped stitches on the finished edging, since they would be very obvious: so I sat down with Hemlock Grove on Netflix and after a few episodes, I was done.
So I now have a roomy laptop sleeve that reminds me of my travels. I'm glad I finally finished it, and quite happy that my laptop will be protected and in style!

I have made laptop cases before, and I always use different methods. I, however do not have any photographs of either, which is one of the reasons why I'm doing this blog: I want to remember what I've made, and see it even after it leaves my hands. The first one I ever made used interfacing on the outside fabric and was lined with black fleece. I sewed around all edges with right sides together and then turned it inside out. I did a quick line of stitching around the opening edge and I think I used hook and loop tape to close it. When I changed computers, I gave my old laptop to my mom, and the sleeve went with it.
The second case I made was for my netbook. I used leftover fabric from quilts, this time Kangas from Tanzania my sister in law had, and some cottons from Joanns. It had a french seam with binding around the edges, and the closure was a button and a loop of cord. Because there was only a center button and the edges weren't rounded, the edges would flip up and drive me mad, but only I noticed, it seemed everyone else complimented me on it! I gave the netbook to my sister when she was left with no computer and no money to buy a new one, and the sleeve went with it as well.

I made the edging by ripping strips from leftover lining fabric, to tie the inside and the outside together. I could've done it on the bias, but because I don't have a cutting mat or rotary cutter, making strips with scissors on a true bias is not worth the effort. I know that bias tape goes nicely around edges when ironed into shape. Because I didn't ease in the tape on the curves, there is less fabric going around the seam allowance than where it was sewn which makes the edging fold DOWN towards the laptop case, looking like it has a lip, and I like how that looks.
I also sewed on the binding by hand: first pass to attach binding and close sleeve was done with the machine, and I noticed my machine skipped a lot of stitches when it was going over bulkier areas. I didn't want to deal with skipped stitches on the finished edging, since they would be very obvious: so I sat down with Hemlock Grove on Netflix and after a few episodes, I was done.
So I now have a roomy laptop sleeve that reminds me of my travels. I'm glad I finally finished it, and quite happy that my laptop will be protected and in style!
No comments:
Post a Comment