Friday, August 2, 2013

Sewing set-up

There 
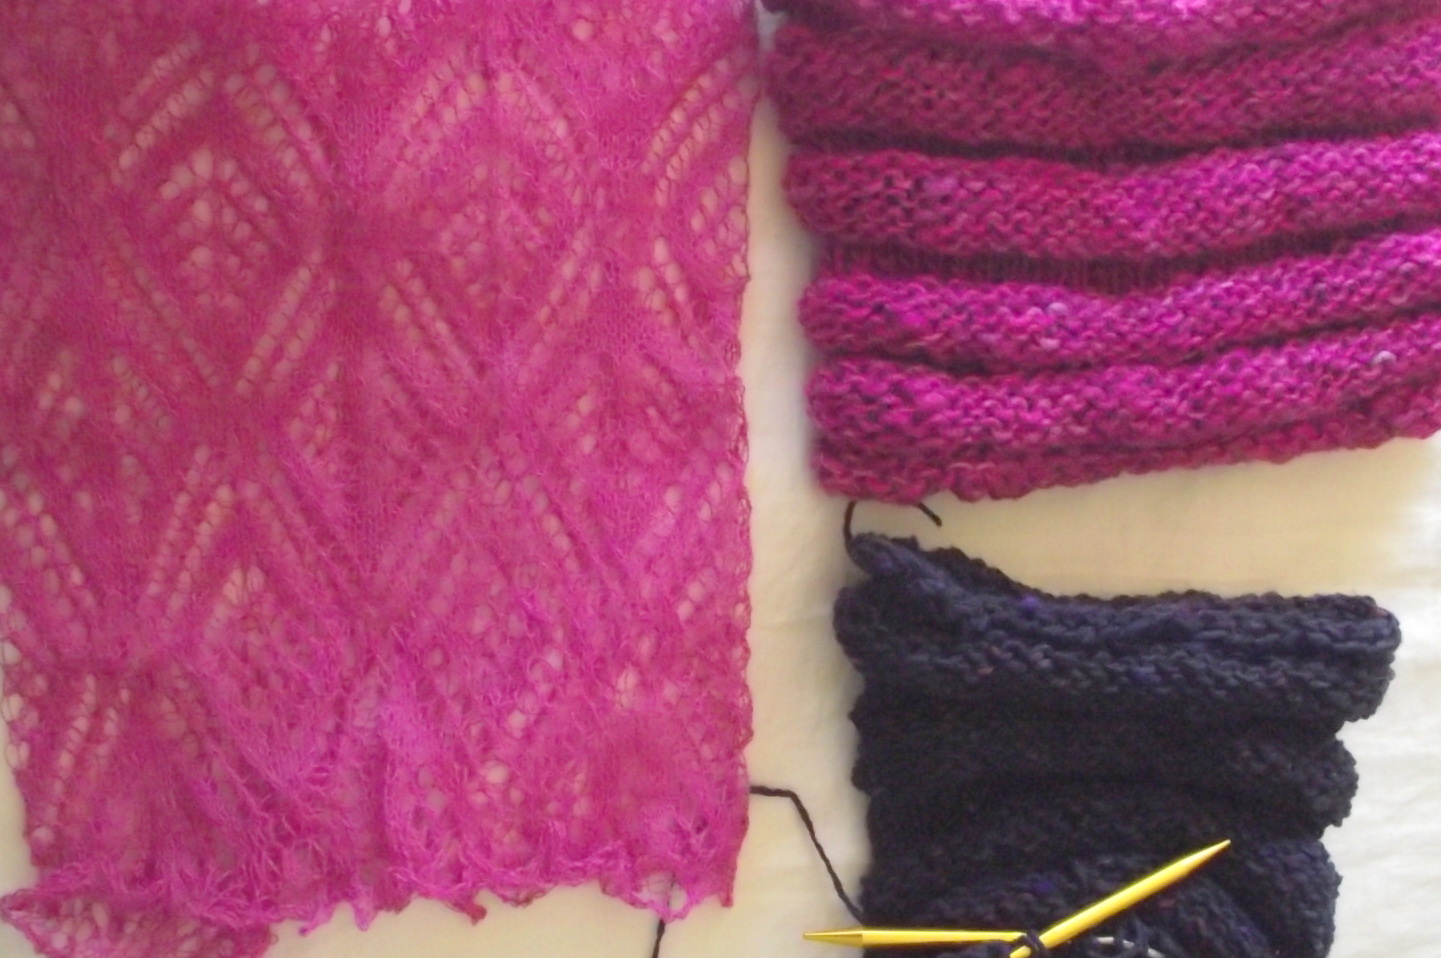
has been no blogging in a while, but there has been a flurry of crafting. After I finished the cowls, I finished the baby blanket that had sat unfinished for years. Sewed up  4 pajama pants and a drawstring backpack for my nephew, fit a skirt sloper and then altered it to make a full skirt as well, and made muslins of both. Also made a tailor's ham and a 
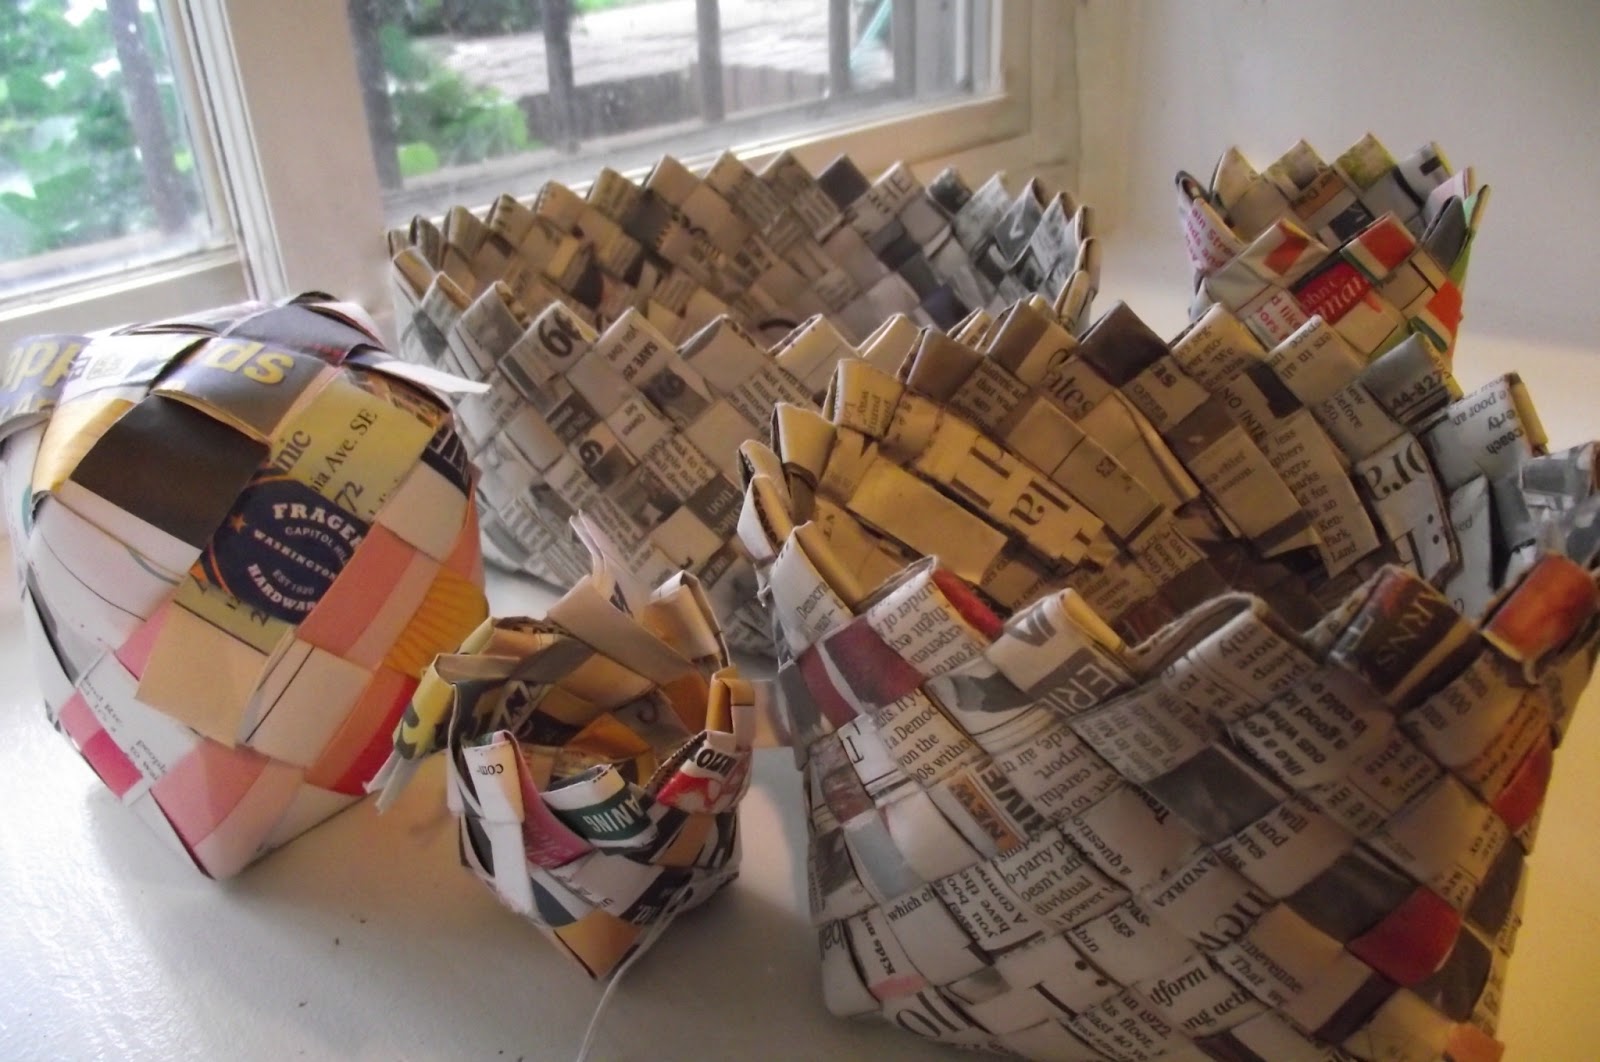
roll for pressing. Then started a new crochet basket.While I feel like I like the "making of stuff" is something I can do well enough, the sharing and showing side is not as strong, so I slack off instead of "practicing". I also forgot to take pictures of the pajamas before shipping them which was exactly what I wanted to avoid when making this blog... I wanted to have a record of my crafty products, and by not blogging, I forgot about making one for them!

I still have these two pictures of the making-of PJ's: First, using an existing pair of PJ's to create a simple pattern.


Then pinning and tracing the pattern on the new fabric. Sewing them up, adding elastic and pressing all the seams. BOOM! Done. And well received, by the way, although I have no further picture evidence.


The tailor's ham and roll

For clothes-making, it seems that ironing every seam improves results. I don't have an ironing board, but these will help to press curved seams on any old surface.

I don't have a dedicated craft area. Mostly I sit on my couch to knit or crochet in front of the TV, but for sewing, I need a larger surface. Hence, my dining room table. It makes for a mess that is always sitting there. I would love to have storage for my fabric, machine and notions that made it easy to clean up. But in a one room apartment, this is as much space as I'll have, so I make do, and clean things up as necessary.


I took some pattern drafting classes many many years ago, but I don't remember much of what I learned, and it didn't cover how to modify commercial patterns, so I am trying to re-teach myself from books and internet.


Thursday, August 1, 2013

Cowls Galore

After the Kuusk cowl, I cast on the swatch for a new lace shawl, but halfway through I realized I needed an easy knit pattern that didn't require a lot of thought, fiddling and was a quick knit. So I cast on and knit the Grace Jones Cowl with some rough spun single ply yarn I had in my stash of free yarn.


Kuusk Cowl

Before and during blocking 

I don't have blocking wires or a surface, so I just placed a towel over a cardboard box, used cotton thread to straighten the sides and then blocked it aggressively overnight.

Such a wrinkly mess!


 Stretching it out the long way, so that it hugs the neck. I'm assuming it will widen with use.


It turned out light and airy, which I'm sure will be perfect for fall. Then I got thinking about winter, and I cast on for a different one.

The Grace Jones Cowls

Actually, there are two of them. For one I cast on more than was required, as I thought it would come out too skinny and wanted it wider. The second I knit as suggested. I am planning a third in double width, to wrap around the neck twice or let it hang down if it gets too hot.  I used the pink and a dark tweedy blue. I followed the pattern, very simple, just rounds in knits then purls and knit until I ran out of yarn.

This is the stash of free yarn. It is thick and thin, spun unevenly and slubby in spots, which I think worked with this simple pattern. Although it broke off in several areas, it was easy enough to splice it together and avoid knots.

Wide one and a slimmer one.
The cowls all together!

Same color, very different look!


Tuesday, July 9, 2013

Making Woven Newspaper Baskets

Last semester I took some classes with Knowledge Commons DC, a volunteer run initiative where people volunteer to teach classes on any subject of their interest, and anyone can take classes for free. I loved sitting through some classes, and wanted to share what I know what to do, so I signed up for volunteering. I heard back from the organization and had to come up with my specific lesson. I decided the easiest craft to do with the most inexpensive materials was the woven paper basket class.


I made some newspaper baskets last year, following the tutorial on It's in the News and they are still going strong. I use them all the time to catch odds and ends and corral little bits that would clutter my bedside shelves. With no glue and only folding required, it was the perfect craft. I've been practicing at home to make some smaller baskets to figure out what the best size would be to teach, and to make some samples to show different variations on the same theme.


I no longer have a source of newspaper, so I decided to use the last month's Hill Rag with good results. The previous baskets had been made with 4 inch wide newspaper strips folded down to half an inch, this batch uses only 2 inch wide strips to make them faster to fold and make for class, making thinner baskets which is OK since they will also be smaller. I had forgotten little details, such as the best way to weave in the ends so the tops are sturdy, and while with the larger baskets it was easy to weave the ends on the inside, with smaller openings, weaving to the outside seems the way to go. I like the patina that the first baskets have acquired, makes them look nice and worn in, fuzzy around the edges.


Mindless TV watching and Simple Knits

I like watching TV while knitting. I used to listen to audiobooks, but that was when I had easier access to them. Now with a tighter budget, and no library card yet, I have instead turned to TV. I like things I can listen to and understand what is going on without having to keep my eyes on the screen, documentaries and DIY shows require too much attention. I don't enjoy reality TV, I think most of it is very catty and it encourages really negative behaviors and competitiveness instead of collaboration so  that leaves mostly series. I started watching Supernatural and then my husband jumped on the bandwagon, so we keep the series to watch when we're both home. So I needed a show I could watch on my own and knit to. And then I rediscovered my love for Korean dramas.

A knitting/crafting friend in Costa Rica got me hooked, by recommending The Coffee Prince, which I watched on YouTube in a week long splurge. I tried watching a different one, but it was incomplete, so I stopped and then life happened and I kind of forgot about it, except as an anecdote.

 I was channel surfing one day and found by accident a show called Secret Garden on Mundo Fox. I love the book The Secret Garden, so I wondered if it was a dramatized series or something. I found a completely different Korean drama, dubbed in Spanish but with English Subtitles! So I set my TV to record the episodes and I sat to knit lace while watching.


I am loving it. It is fascinating how culture is portrayed in shows, and I'm sure that Korean dramas have as much to do with Real Life as Telenovelas have to do with life in Latin America. I sometimes wonder if something I see has roots in reality or if it is soap opera fiction... I watch a webshow called Eat Your Kimchi that is made in Korea by Canadians explaining bits about culture and life in Korea, so now I'm kind of hoping I'll get to visit some day!

Back to the series. With only an episode a day and more knitting to be done, I decided I needed some more. So I did a quick search online, and found several on Netflix.  I picked one of the highest rated ones, Boys Over Flowers and after a couple of episodes, I was hooked.  However, my lace knitting was all but forgotten on my lap, since lace charts and subtitles (Series is in Korean with English Subtitles) do not mix.

So I brought out from UFO storage: the baby blanket I've been working on for close to two years. The pattern is easy enough that I can knit without taking my eyes off the screen for more than a few seconds, and I'm really enjoying the show, and feel happy about getting closer to finally completing the blanket. Win-Win.


Wednesday, July 3, 2013

Knitting the Kuusk Lace Cowl

 As soon as I cast off the shawl, I swatched for a new lace project, the Kuusk cowl, not because I wanted to see the gauge, but because I wanted to try out the pattern and nupps before jumping in.

The swatch was made with this cone of mystery fiber, which I then unraveled.  I had to do 3 repeats of the pattern: the first time, this swatch here, I forgot to adjust the lace pattern for the fact that I wasn't knitting in the round, so I ended up with garter stitch lace. I then did a second repeat making sure to purl on the way back, but the weave was too open. So the third time I adjusted to a smaller needle size and decided I could handle the pattern.This tiny square I didn't want to reclaim, it was from yarn I had unwound from the outside because it was decolored and stained, but knit up, you could hardly tell. In any case, I think there is enough of this yarn so that I won't need this extra bit!

The actual cowl is made with a lucious 100% alpaca skein I got at the sheep and wool festival. I have decided I need more color in my life, and pink looks nice and warming. So a pink lacy cowl it shall be, just perfect for fall and winter. 

 I have a hard time selecting yarn for a project and not doubting my decision.

At the Sheep and Wool festival I bought two skeins of alpaca, 550 yards of it, in this pink and a purple.  I didn't know which one to use for this cowl. In my mind I had an idea for a striped lace shawl, taking into account that the purple and pink go lovely together, but I just didn't find a pattern I liked enough... mostly because I don't actually think I'll wear a shawl, and also because I don't have the budget to buy one when I'm not sure about the result.  So I decided to make a cowl, which I know for sure I will wear and the pattern was free. 

 Now I feel I'm having regrets, after knitting the swatch with the cone, I kind of wish I hadn't bought the purple alpaca lace, considering that I now have two very similar yarns in purple in my stash, and no chance to make my stripey dream. I can't unknit or frog, because the yarn is so grabby, and also I'm not sure I want to! I love the way the cowl is turning out, I just feel sorry for the lonely purple lace that will no longer have its chance to shine in a striped wrap of some sort.

I want to use the yarn on the cone... I feel like I'll be able to make one of those ginormous shawls without joining any ends or running out. Because I kind of know I won't wear a shawl, it won't necessarily matter if it isn't next-to-skin soft... But do I want to put in the effort for a lovely intricate shawl and then never wear it because it is scratchy? Does it even matter?

I hold onto the hope that there is some of this pink lace left over, so I can maybe include it in a future project with the purple alpaca. At the end of the day, I really like the way this pink cowl is turning out... so I'm happy for that, and I'm sure that once I'm wearing the cowl, I won't even think about this any more.

Blocked Holden Shawlette

Finally finished the Holden Shawlette!  For my first triangular shawl, it went pretty well.

 I used some vintage Indiecita Alpaca that is labeled as  "approximately 50 Grams", no yardage given, and though it says it is 3 ply sports weight, it acts more like fingering weight. The shawlette took 2 balls and a bit extra, since I ran out of the second ball of yarn about 5 inches short of picot bind-off. Thank goodness I had extras. After finishing the shawl, there are still 8 balls of this yarn to go, and I have no idea what I'll make with them... maybe a really big yarneating shawl, since it was nice to work with.

It's interesting to me how labels have changed, back them it didn't seem that necessary to add as much information as they do now. Note where it says Natural Color, Not Dyed, and right next to it Dyed Color, and no yardage information. 


Although it came off the needles a while back, I wasn't ready to block it. I have nudged other knit projects in the past, the last time it was a woodland scarf that I pinned on a towel on the living room rug. Although it stayed there overnight, I removed it the next day while it was not completely dry and it didn't stretch out as much as I wanted, or perhaps it just shrunk back. So with that in mind, I was a bit apprehensive about the process, but braved it anyway.

I did notice that this yarn bleeds a bit. I put it in water to wash it and the water was bright pink! It reminded me of a visit to Bolivia, when we first saw cochineal bugs, and discovered that's where carmine color came from. To keep it from crazy bleeding over other clothing once it's worn, I added white vinegar to the water and hope it helps. In any case, this happens to be a shawl for my sister, who I always kid about her love of these dark reds that bleed in the wash. 

I don't have blocking wires or a dedicated surface for blocking, so for the shawl I decided to block it over the afternoon on the bed. I laid an extra sheet over the end and started pinning starting at the corner of the bed with the triangle's 90° angle.  Halfway through the drying process I wove in some  cotton yarn through the long edge to straighten it up, after realizing I didn't have enough pins to make sure I didn't get scallops.

Here is the finished shawlette, measuring 62 x 24 inches, just perfect for wrapping around the neck and shoulders.


The color is a lot redder in person.  I shall package this and send it off to my sister, in thanks for some sewing patterns she bought for me and mailed!


Friday, June 14, 2013

Alfajores

I'm getting a bit better with meal planning: I'm making yummy food for dinner with leftovers for lunch the next day. For example: this week we had mango cheese-cake popsicles, Colombian empanadas, a cold pasta salad and alfajores. I don't usually take pictures of when I cook or the process because I don't feel too great about my kitchen, there's not enough space or good spots for nice pictures and lighting is far from ideal. Also, I'm mostly cooking other people's recipes and it doesn't make much sense to do a tutorial of cooking what someone else made (and for which they already have a tutorial). Except perhaps to say YAY! Yummy.

I am adding successful recipes to a Pinterest board so that I can quickly go over them and repeat past successes.  But back to last week's experiments. Here are some pics of the alfajores I made:  I covered some in chocolate in the Argentinean style to add a little twist to the recipe.  When my beater wasn't working I worried about the cookies, but it turned out that creaming the sugar and butter by hand was just fine, the end product was just as delicious.  I'm now on the hunt for a round cookie cutter to make smaller cookies, for these I used a drinking glass and an empty crystal light canister, and ended up with just about 10 alfajores. Smaller cutter would equal more alfajores, making them easier to share.


Now that I know that the alfajores are yummy and easy to make, perhaps next time I will take some pictures, and document my own twists on the recipe. I'm thinking I could include some lemon zest in the shortbread, and then finish them differently, for example rolling the edges in coconut, dusting with sugar or coating with chocolate: 3 different kinds of alfajores to chose from, in dainty sizes to share. Sounds like a plan.

Thursday, June 13, 2013

Volunteering at ScrapDC

 I've been working on a freelance job, so while it does not take up all my time, I find that once I sit in front of a computer, I tend to spend most of my day there, and it is  easy to get distracted from work due to shiny internet stuff.  However, I have been busy!

I volunteer at a creative reuse center called ScrapDC at 52 O St. NW and last week my schedule was packed with ScrapDC activities!  I went over there on Thursday to do my hours, where I usually organize shelves, put away things and sometimes make new things from the materials available at the store. A previous week, I spent the whole afternoon organizing the fabric area, and it ended up looking like this:

Not too bad for different sizes, weights and types of fabric!


Then on Friday I went to a neighborhood public charter school that we've been working with as a judge for a creative reuse vocabulary fashion show, where kids would have to illustrate through a costume a vocabulary word, ideally repurposing and recycling materials, instead of buying things new.  On Saturday morning we were at the Renwick: they were hosting a family day with crafting activities and we had gift packages made with empty toilet paper rolls and decorated with fabric, string and paper. Some great pictures of the finished products are on the Facebook page. I also had a chance to make stuff from the other organizations there: I made a pipecleaner kitty sculpture in a jar, and a beaded bracelet:


I love making things, and whenever I'm at Scrap I can't help but be inspired by all the materials around me. With the lack of craft, fabric or notions stores that are metro accessible in DC Scrap certainly fills a niche and I'm happy to be a part of it.

Wednesday, June 12, 2013

Making a Quilted Laptop Sleeve

So what have I been up to?  I've completed another of my "to do" tasks on the sidebar! I FINALLY finished the laptop sleeve I'd been making, tired of stuffing my computer without any protective layer inside my handbag, where all sorts of unsavory finish-marring characters hang around. I used some Marimekko fabric from the Crate&Barrel outlet for the inside, a scrap of poly-batting and then some kitenge looking fabric I got in the street market in Nairobi, Kenya for the outside. The hook and loop tape was repurposed from one of those cloth bags they are packaging bed sheets in nowadays.


 I have made laptop cases before, and I always use different methods. I, however do not have any photographs of either, which is one of the reasons why I'm doing this blog: I want to remember what I've made, and see it even after it leaves my hands. The first one I ever made used interfacing on the outside fabric and was lined with black fleece. I sewed around all edges with right sides together and then turned it inside out. I did a quick line of stitching around the opening edge and I think I used hook and loop tape to close it.  When I changed computers, I gave my old laptop to my mom, and the sleeve went with it.

The second case I made was for my netbook. I used leftover fabric from quilts, this time Kangas from Tanzania my sister in law had, and some cottons from Joanns. It had a french seam with binding around the edges, and the closure was a button and a loop of cord. Because there was only a center button and the edges weren't rounded, the edges would flip up and drive me mad, but only I noticed, it seemed everyone else complimented me on it! I gave the netbook to my sister when she was left with no computer and no money to buy a new one, and the sleeve went with it as well.

While making the current sleeve, I traced around my laptop and added a bit extra so that I would be able to put the cables or mouse in the sleeve with the computer if I needed to.  I quilted it first, making a sandwich with the fabrics and the batting, then I cut out the specific shape I had decided, and I sewed it with the lining to the inside and the edging on top so that I could fold it over and cover the seam allowances.  The front of the sleeve has more fabric than the back, to make room for the height of the computer. From the side, the binding is flat on the tabletop, instead of sticking out in the middle, which would've happened had the front and back been the same width. In the bottom, I just made some pleats to ease in the difference.


 I made the edging by ripping strips from leftover lining fabric, to tie the inside and the outside together. I could've done it on the bias, but because I don't have a cutting mat or rotary cutter, making strips with scissors on a true bias is not worth the effort.  I know that bias tape goes nicely around edges when ironed into shape. Because I didn't ease in the tape on the curves, there is less fabric going around the seam allowance than where it was sewn which makes the edging fold DOWN towards the laptop case, looking like it has a lip, and I like how that looks.

I also sewed on the binding by hand: first pass to attach binding and close sleeve was done with the machine, and I noticed my machine skipped a lot of stitches when it was going over bulkier areas. I didn't want to deal with skipped stitches on the finished edging, since they would be very obvious: so I sat down with Hemlock Grove on Netflix and after a few episodes, I was done.

So I now have a roomy laptop sleeve that reminds me of my travels. I'm glad I finally finished it, and quite happy that my laptop will be protected and in style!


Tuesday, June 4, 2013

Adding a cross-body strap to a purse

I have a handbag that I love to use. It is big and roomy and the olive canvas with brown accents is neutral enough that it goes with most anything. However, it keeps slipping from my shoulders whenever I use it, so whenever I wear it, I only have one hand free to do other things since the other is needed to keep the purse in place.  I decided to solve the problem by making a strap for it!


 Sometimes I need to force myself to just get things done: I had procrastinated the sewing of the strap because I wanted to sew it on the machine, make it adjustable, removable and I was waiting to find the right fabric, the leather remnant, the metal slides in similar finish and the clips so that it matched the rest of the purse.  And in waiting for the "perfect match" I was walking around with an unsolved problem.

In the end, my need was to have a cross body purse strap. Not to have the best looking, most amazing dead-ringer strap. So on the belief that anything is better than nothing, I just went ahead and made one with what I had in hand. Cost for the project = 0.

I cut a strip from an upholstery fabric remnant I had lying around that was in the same muted hues as the purse. I folded the raw edges in and then using embroidery floss I sewed a double sided running stitch.  For the end I just folded in the selvedge and did some cross stitches to keep it in place, with the sides being visibly whip stitched together.  

I liked this experiment in doing instead of thinking about doing. I call it success!


Friday, May 31, 2013

How to Crochet an Area Rug with Yarn

Yesterday I finally finished crocheting the colorful area rug! 

Cat for scale.
A few months ago I received two trash bags full of old yarn. I was warned they were not color coordinated, and were all different sizes and weights and it looked like mostly acrylic, but still took them since I didn't have a lot of yarn then, and wanted to try some scrap blankets and colorful projects.   After testing the yarn using the burn test, I determined most of it was  acrylic, but some balls were wool.  I started a ripple stitch blanket and quickly realized that I would not be able to have the stripes be all one same color, so I did a smaller crocheted cushion cover instead. 

Catherine Wheel cushion, learned stitch from YouTube videos!


I crocheted a basket to hold my stationary, as well as some slippers for my husband. I made some dryer balls. I gave a few balls of yarn to my cat who likes to chase them around the house and fight with them.  The pile of yarn stayed the same, though, still huge, still taking up a lot of space in the closet. I needed a yarn-eater project. And so the area rug was born.

The only colors I avoided were the browns. Other than that I just grabbed colors as they came. Holding 9 strands of yarn together I started going around in an oval. I have some experience with crochet, so I just winged this without a pattern. I didn't want to be counting , but in general you want to increase in the rounded edges, then crochet normally on the straight edges. On some rounds I increased 5 times, others just 3, or none, depending on how it looked, trying to keep it from waving (too many increases) or curling (too few).  But instructions like these might help. Because the balls of yarn were not all equal, some of them ran out before the others, which helped stagger the color changes. In some cases, if I had the same color, I just tied the ends of the yarn with a square not and continued crocheting with the new ball. Other times I just found a color that looked like it was in the same "family", or that it might add something interesting to the rug. That's how it turned out to change colors depending on the dominant tints, going from a yellowish center to a hot pink round and then to orange and green.

At the end of the rug, when I was already down to the last balls of yarn and didn't have enough for substituting the colors when they ran out, I just did an extra round around the rug, and then sewed in the end: no fancy finishes or edgings.

While it doesn't show up in pictures, the rug does want to curl up around the edge: I'm guessing that because I continued knitting with a thinner strand as the yarns ran out, I should've gone up a needle size, or made the stitches a lot larger to compensate. For now I'll see if it settles on its own, but if not, I'll probably rework the last couple of rounds.  I also broke the hook halfway through the project. I bought a set of 6 glittery hooks in Joann's about 7 years ago, and little by little they've been snapping  right in the middle. It happened while knitting the round basket, and I had to toss the substitute the needle halfway through with a different size. This time, I decided to repair it: I held the broken edges over the flame of a candle to melt the plastic, then smooshed them together. I wrapped some tape around the bump caused by the fused plastic squeezing out the ends to make it smoother, and was able to finish the rug. The hook feels strong, so I may keep it and continue using it.

repaired hook with a view of the wrong side of the rug
I am not only happy that I finished the area rug, which is now covering the floor next to my side of the bed, but that I also went through ALL THAT YARN. There is still about a shopping bag full of odds and ends of yarn in browns, tans and variegated colors, but that will be easier to stash away in a corner until I come up with an idea for it.

Tuesday, May 28, 2013

Making time for Making

I thought that if I didn't have to work, I'd become a production powerhouse, plowing through DIY projects and learning new skills. But the reality of working from home, then becoming unemployed, has been very different.  At first I became depressed: winter blues and getting laid off, along with health problems do not go well together. Currently I have a freelance gig, so while a bit of income is trickling in, I still have a lot of hours to do "other" stuff.

Sadly, most of them go down the timesink of social media. I wake up and fool around on Pinterest, read my blogs, go through my twitter feed, catch up on Facebook and 2 hours have been spent. Sometimes I do all that when I'm supposed to be working, so my "work hours" of sitting in front of a computer multiply and when I notice, it is 5pm, I've been sitting in front of the computer all day and I still have to finish my freelance work. And the pile of dishes stares at me. And I still have dinner and lunch to plan for the next day, and cook. And whatever bit of picking up around the house I need to do.

This blog is in a way my excuse to make something productive out of all the time I spend on social media, mostly looking for inspiration and ideas of my next project, my next household DIY, the next craft I want to begin and recipes I bookmark for someday. I want to make all of those into tangible goods, and document them here. And not just the ones that turn out well.

I wish I had documented last week's efforts to improve my bookcase coat rack by sticking some fabric to the back of the bookcase using starch.  Let me just tell you that I should've tested with a small strip before cutting the fabric and then realizing it shrunk when it came in contact with the starch, and also that hey, starch lacked the sticking power. I kludged it by wedging the fabric between the backboard and the bookcase around the existing nails and by using some mounting tape. I will definitely be redoing it, since it taunts me every time I come into the house and hang my jacket. Bad enough that I don't even want to show the full thing, just the upper right/hand side corner.


I'm saving energy for re-doing it, since I'll need to buy new fabric... the one I used is unsalvageable, sadly.

And so, I-ll add it to my list of projects, which I'll also add to the sidebar, so that I can keep them in mind!

Currently on my work in progress list are:

  • knit garter stitch baby blanket 
  • knit lace alpaca shawlette
  •  a crocheted oval area rug made with a great variety of odd balls of yarn I got from someone's garage, mostly acrylics.
  • hand stitched strap from upholstery fabric for a purse I'd like to use as a cross body bag. 
  • a sewn and quilted laptop sleeve
  • fix bookcase mishap

On the next project list:

  • Constellation embroidery hoops
  • Blue queen size pieced and quilted duvet cover. 
  • pajama pants for my nephew
  • DIY loom (and loom knit scarves)
  • More knit lace shawls
  • sun print art


Friday, May 24, 2013

Thoughts on Starting a Business out of Making

Ever so often the idea to make a living out of making stuff pops up in my life. I even went as far as moving to Colombia to pursue a career in making things (and being my own boss) although it was going to be more technical instead of creative: I enrolled in a program to become a dental technician, making retainers, dentures and others to the surprise of everyone who knew me.  I liked making things, but when my work writing and teaching at a local university collided with the class schedule I crunched some numbers about what I'd be making financially once I graduated, I decided not to continue. I didn't love it enough to do it for so little.  

My technical handiwork
I didn't stop making things, though.  In the past, when thinking about making things (and charge money for them) I've decided not to do so. For example, I did the numbers on a hand knit hat a friend asked me to make.  It takes me a few days of knitting to make a hat, there's the cost of materials and the price of my labor. Then overhead. By the time I had a number, it was beyond what my friend could afford. So I just asked her to buy the yarn and I made it for her as a gift.


those i-cords and pompoms took forever

Five years ago, when looking at the craft market, the most I could aspire to was selling to my circle of acquaintances, selling to boutiques as a consignment or trying to get into the craft markets in Latin America. But it just wasn't a market that values hand-made goods as much as in other places, I think mostly because labor is cheap. In Colombia on 2007, I went to an artisan expo organized by the government of Medellin. What I found is that I had a much higher appreciation of what things are worth that was at odds with the reality of the market. For example, this dazzling 78 by 72 inch crochet bedspread made in embroidery thread.  Who knows how many months of time went into it, and how much thread, and the skill to put it all together by hand. The asking price? 400 USD.


87 Inches by 82, for 400 USD

 At the same artists' expo I met a lacemaker, Doña Amparo. She told me about how she had learned to make lace at the age of 5 from her mother. The money they earned from selling the lace made it possible for her to buy shoes or clothes.  So Amparo had a lifetime of experience in a fairly uncommon craft... and the price for the doily was 11 USD.


I was a broke student and even those low prices were out of my range, but those goods would have definitely been underpriced had they been in an international market. While 11 USD is pocket money here in the USA,  in Colombia, that doily will buy a week's worth of food.
All this for less than the cost of the doily.

I am now in a different place and time, and so I went over to Etsy since that's where I've recently bought handmade goods. They have a whole "seller school" series which I've taken a bit of a look into today. I sat through a couple of online Etsy Lab talks, one about pricing goods correctly to make sure your business thrives, and a second one on how to take good photographs of your products.  I'm not sure that I will follow the path of entrepreneurship of handcrafted goods, but if I ever do, I want to do it in a well informed fashion. And in the meantime, I'll polish up on my photography skills: all these pictures above were taken years ago, and my skills haven't improved much since then.

On Chevron Quilts

Today I was thinking about quilts. I have a shopping bag full of fabric remnants I got for free all in dark blues that I would love to piece together. I've made three quilts in my life, and only one of those from start to finish.  The first was for my brother, a quillow. a lap quilt that gets folded into a pocket and turns into a pillow, that my mother and I pieced using simple rectangles and then I quilted using straight lines on our home sewing machine. The second was a hand pieced quilt my sister in law made with her mother that had sat unfinished for a long time. I took it home with me and finished the hand stitch in the ditch quilting, repaired some seams that were coming apart and then bound the quilt. The third is a quilt I made for that same sister in law, this time when I was a guest at their home. I used mostly kanga fabrics that had been brought from Tanzania and Zimbabwe, centering the patterns the best I could so that the large designs would show up nicely and I added quite a bit of  purchased fabrics to fill out the pattern and make it a queen size bed spread which I then wrangled under the borrowed sewing machine and quilted using a walking foot. It was a great experiment which you can see below, folded in half.


Now I'm thinking about the new quilt. It will probably be a pieced duvet cover, since we do have our feather duvets we enjoy using in the winter, and this way we'll be able to use it on its own in the summer as a very light quilt, or in the winter with the feathery insides.

 I feel that now that it seems that the rage for chevrons is cooling off, I can give in to them knowing that it is not just fashion fever talking, but that I actually like the look.  Sometimes I have a hard time telling if I like some things because I see them everywhere and it seems everyone else likes them, or if I honestly like them. Like the ombre trend. But I digress. (although maybe next quilt will be a hand-dyed cotton ombre quilt.. hmmmm)

So there are apparently a few ways to make Chevrons.

One is using stripes, cutting them into squares and piecing them to make the zigzags like the next example from crazy mom quilts that I found on the bee square blog.
 the other is using larger quarter square triangles in strips and  offsetting them.
like the next example from Rebecca on the Threadbias blog.
 a third is using triangles into squares and piecing the points, like Sew Caroline explains on her blog, which she used for a smaller project, a bag. An ombre chevron bag. Be still my beating heart, not yet, not yet.

I haven't made up my mind which I'll use yet, perhaps I'll do more research, or attempt a "trial run".I can see the advantage of the strips into squares and then into chevrons, but because the fabrics I have tend to run in bigger prints, I think it would be better to have larger squares instead of such teeny tiny ones, so that the pattern shows better.

I would like to fool-proof the piecing, since I'm not that great at sewing at the intended seam allowances, a fact I learned while making my last quilt, where my calculations were completely wrong and the quilt turned out a lot smaller than I intended, and I had to improvise with a wider border. In the end it turned out well, but I'd like to improve with each quilt... I hope accurate measurements is not too much to ask.  One of my other goals is to try and limit myself to using the fabrics I already have, so I am OK with the pattern looking somewhat different, but if I run short of fabric, I'm still open to getting needed fabric from the creative reuse center where I volunteer, Scrap DC.

And as for quilting, I'll either do a simple stitch in the ditch on my home machine, or this lovely colorful running stitch. Because I won't be quilting through many layers, just the top and lining, I think it won't be too hard to get even stitches... and I do have lots of blue embroidery floss!


While searching for the quilt pattern, I stumbled on the beautiful Gees Bend quilts. I spent a bit of time reading about them and looking at the designs, at how they were just sewn going with the flow, with what the fabric dictated, and then ended up looking really lovely. From what the quilters explain, it is all quite effortless for them.  I hope I can someday develop that flair with color and value balance, until then, I'll just continue to enjoy looking at the quilts and thinking that no matter what my quilt ends up looking like, if it's done with love and care, it'll be perfect for us. 
From the Smithsonian's site:  "It was Annie Mae Young's 1976 work-clothes quilt that caught collector William Arnett's eye and led to the Gee's Bend exhibitions."

Thursday, May 23, 2013

awkward first post is awkward

Thanks for reading this blog!  This is a scrapbook/notebook/diary of the things I make for myself, my home and the people I love.  The internet has been such a great source of inspiration, knowledge and training in many of the crafts I do, that I'd like to be able to thank the people who fill the web with ways in which to learn new skills. And I think a blog is a great place to list my inspiration sources, the tutorials I get things from and then show the finished products I make.  I'd like to learn how to take better pictures of the things I make, and perhaps once I feel comfortable with a camera, I'll be able to share some of my original ideas with others.


I'm currently living in the USA and my origins are in Latin America, so this blog might get bilingual, with sources and inspiration in Spanish or English.